Use DuckDB with Apache Airflow
DuckDB is an open-source in-process SQL OLAP database management system. It allows you to run complex queries on relational datasets using either local, file-based DuckDB instances, or the cloud service MotherDuck. The ability to create a local DuckDB instance is useful for testing complex Airflow pipelines without the need to connect to a remote database.
Airflow can interact with DuckDB in two key ways:
- Use the DuckDB Python package directly in @task decorated tasks. This method is useful if you want to do ad-hoc analysis in-memory or combine information stored in various DuckDB files.
- Connect to DuckDB via the DuckDB Airflow provider. The DuckDB Airflow provider is ideal if you access the same DuckDB database from many tasks in your Airflow environment and want to standardize this connection in a central place. You can also use the DuckDBHook to create custom operators to modularize your DuckDB interactions from within Airflow.
There are multiple resources for learning about this topic. See also:
- Webinar: How to use DuckDB with Airflow.
- Example repository: Astronomer's DuckDB example repository.
Time to complete
This tutorial takes approximately 15 minutes to complete.
Assumed knowledge
To get the most out of this tutorial, make sure you have an understanding of:
- The basics of DuckDB. See the DuckDB documentation.
- Airflow fundamentals, such as writing DAGs and defining tasks. See Get started with Apache Airflow.
- Airflow decorators. See Introduction to Airflow decorators.
- Airflow connections. See Manage connections in Apache Airflow.
Prerequisites
- The Astro CLI.
Step 1: Configure your Astro project
To use DuckDB with Airflow, install the DuckDB Airflow provider in your Astro project. This will also install the newest version of the DuckDB Python package.
-
Create a new Astro project:
$ mkdir astro-duckdb-tutorial && cd astro-duckdb-tutorial
$ astro dev init -
Add the DuckDB Airflow provider to your Astro project
requirements.txtfile.airflow-provider-duckdb==0.2.0 -
If you are connecting to MotherDuck, the DuckDB cloud service, you need to use the amd64 version of Astro Runtime to prevent package conflicts. In this case, replace the
FROMstatement in your Dockerfile with the following line:FROM quay.io/astronomer/astro-runtime:8.6.0If you are only using DuckDB locally, you do not need to modify your Dockerfile.
Step 2: Create a DAG using the DuckDB Python package
You can use the duckdb Python package directly in your @task decorated tasks. This method does not require you to configure an Airflow connection.
-
Start Airflow by running
astro dev start. -
Create a new file in your
dagsfolder calledduckdb_tutorial_dag_1.py. -
Copy and paste the following DAG code into the file:
"""
### DuckDB Tutorial DAG 1

This DAG shows how to use the DuckDB package directly in a @task decorated task.
"""

from airflow.decorators import dag, task
from pendulum import datetime
import duckdb
import pandas as pd


@dag(start_date=datetime(2023, 6, 1), schedule=None, catchup=False)
def duckdb_tutorial_dag_1():
    @task
    def create_pandas_df():
        "Create a pandas DataFrame with toy data and return it."
        ducks_in_my_garden_df = pd.DataFrame(
            {"colors": ["blue", "red", "yellow"], "numbers": [2, 3, 4]}
        )

        return ducks_in_my_garden_df

    @task
    def create_duckdb_table_from_pandas_df(ducks_in_my_garden_df):
        "Create a table in DuckDB based on a pandas DataFrame and query it"

        # change the path to connect to a different database
        conn = duckdb.connect("include/my_garden_ducks.db")
        conn.sql(
            f"""CREATE TABLE IF NOT EXISTS ducks_garden AS
            SELECT * FROM ducks_in_my_garden_df;"""
        )

        sets_of_ducks = conn.sql("SELECT numbers FROM ducks_garden;").fetchall()
        for ducks in sets_of_ducks:
            print("quack " * ducks[0])

    create_duckdb_table_from_pandas_df(ducks_in_my_garden_df=create_pandas_df())


duckdb_tutorial_dag_1()
This simple DAG passes a pandas DataFrame from an upstream task to a downstream task. The downstream task uses the DuckDB Python package to create and query a table in DuckDB. You can control the database you connect to by changing the string in the
duckdb.connect()function:- Use an empty string to utilize an in-memory database (For example,
duckdb.connect("")). - Specify a local file path to create/connect to a local DuckDB database in which your table will persist (For example,
duckdb.connect("include/my_garden_ducks.db")) - Specify a MotherDuck connection string without a database to connect to your default MotherDuck database (For example,
duckdb.connect(f"motherduck:?token={YOUR_MOTHERDUCK_TOKEN}")). - Specify a MotherDuck connection string with a database to connect to a specific MotherDuck database (For example,
duckdb.connect(f"motherduck:{YOUR_DB}?token={YOUR_MOTHERDUCK_TOKEN}"))
- Use an empty string to utilize an in-memory database (For example,
-
Open Airflow at
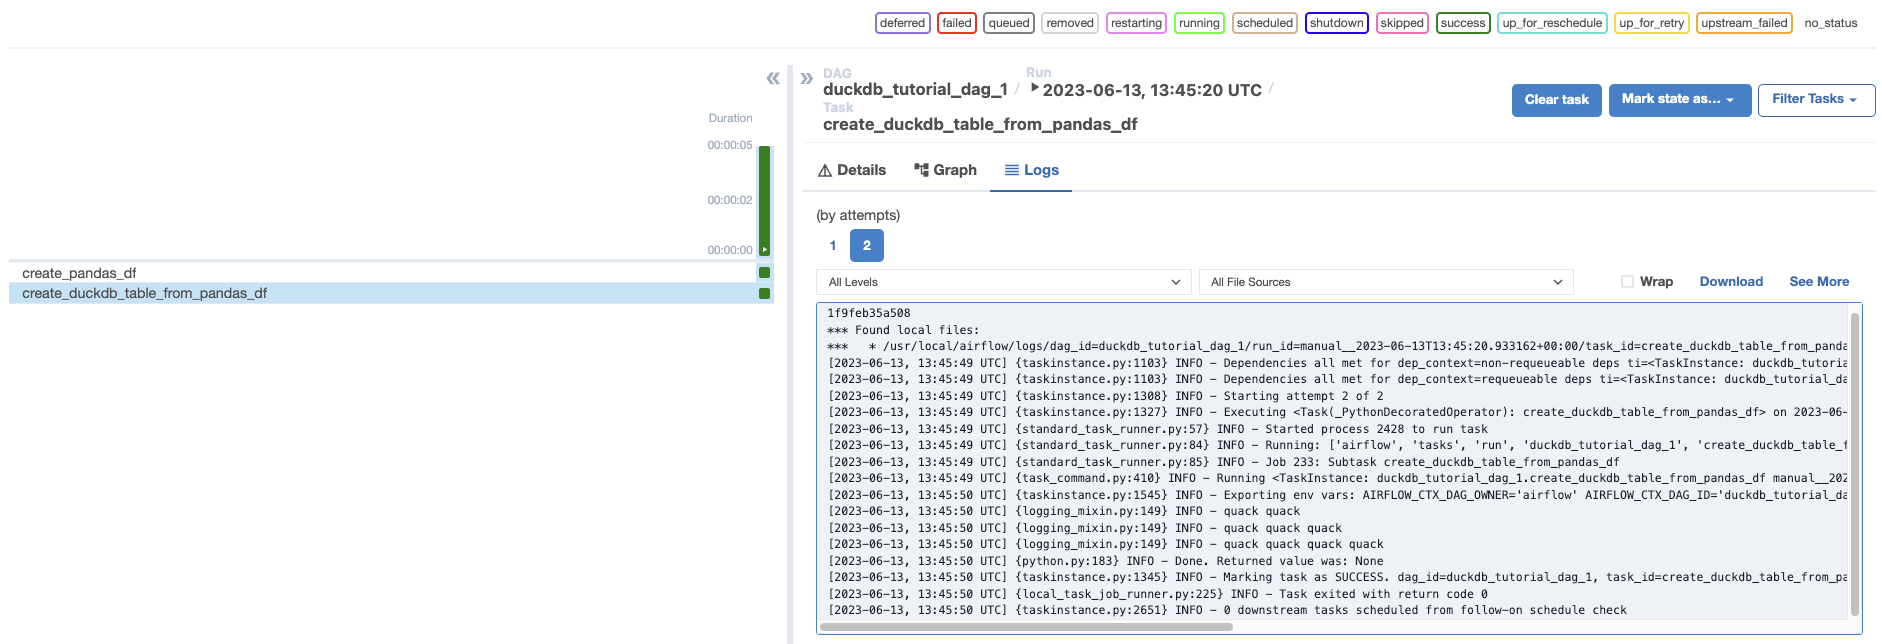
http://localhost:8080/. Run the DAG manually by clicking the play button, then click the DAG name to view the DAG in the Grid view. In the logs forcreate_duckdb_table_from_pandas_df, you will find a quack for each duck in your garden.
Step 3: Create a DuckDB Airflow connection
Next, you will create a DAG that instead uses the DuckDB Airflow provider. To use the provider, you will need to define an Airflow connection to your DuckDB database.
-
In the Airflow UI, go to Admin -> Connections and click +.
-
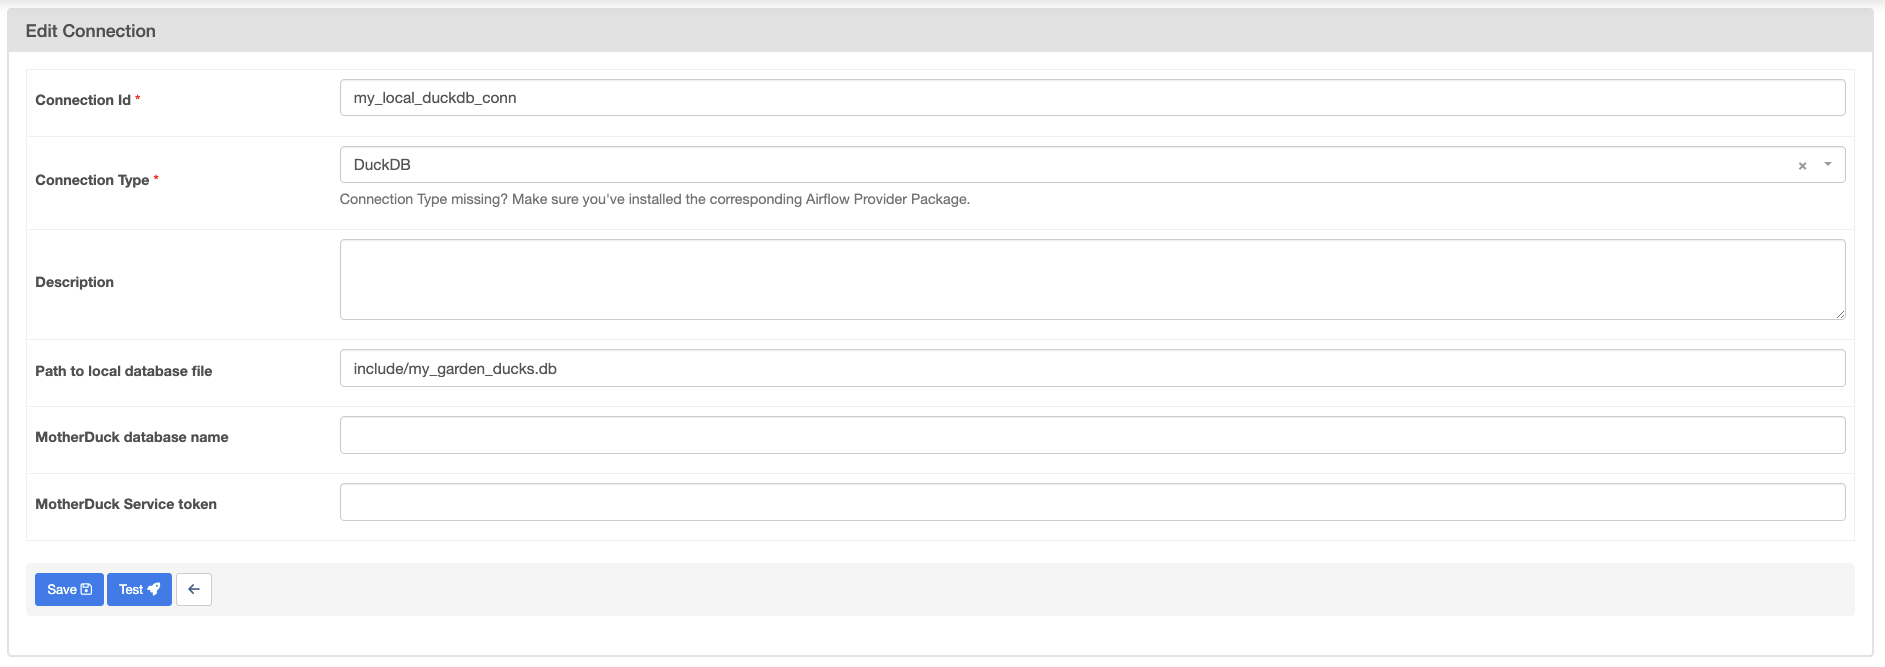
Create a new connection named
my_local_duckdb_connusing the following information:- Connection ID:
my_local_duckdb_conn. - Connection Type:
DuckDB. - Path to local database file:
include/my_garden_ducks.db.

- Connection ID:
-
Click Save. Note that you cannot currently test a connection to DuckDB from the Airflow UI.
If you are connecting to MotherDuck, you will need to add your MotherDuck Service token in the MotherDuck Service token field and leave the Path to local database file field empty. Optionally, you can add a MotherDuck database name in the MotherDuck database name field. The default name is the default MotherDuck database (my_db).
Step 4: Create a DAG using the Airflow DuckDB provider
-
Create a new file in your
dagsfolder calledduckdb_tutorial_dag_2.py. -
Copy and paste the following DAG code into the file:
"""
### DuckDB tutorial DAG 2

This DAG shows how to use the DuckDBHook in an Airflow task.
"""

from airflow.decorators import dag, task
from pendulum import datetime
from duckdb_provider.hooks.duckdb_hook import DuckDBHook

DUCKDB_CONN_ID = "my_local_duckdb_conn"
DUCKDB_TABLE_NAME = "ducks_garden"


@dag(start_date=datetime(2023, 6, 1), schedule=None, catchup=False)
def duckdb_tutorial_dag_2():
    @task
    def query_duckdb(my_table, conn_id):
        my_duck_hook = DuckDBHook.get_hook(conn_id)
        conn = my_duck_hook.get_conn()

        r = conn.execute(f"SELECT * FROM {my_table};").fetchall()
        print(r)

        return r

    query_duckdb(my_table=DUCKDB_TABLE_NAME, conn_id=DUCKDB_CONN_ID)


duckdb_tutorial_dag_2()
This simple DAG will query all information from a table in a DuckDB instance. Make sure the table you are querying exists in the DuckDB instance you specified in your DuckDB connection.
-
Open Airflow at
http://localhost:8080/. Run the DAG manually by clicking the play button.
You can use the DuckDBHook to create custom operators to modularize your interactions with DuckDB. You can find an example of a custom DuckDB operator for ingesting Excel files here.
Conclusion
Congratulations! You successfully used DuckDB with Airflow. Quack!